Wednesday, December 26, 2012

Winners - #42 - For A Gift

I hope all of you had a lovely Christmas and are staying safe if you have any ugly weather (we are expecting 20 cm of snow tonight).

Here are the winners from our last challenge for 2012:

The random winner of a digi of our choice and a winner's badge is MYNNETTE.

The Design Team has chosen this gorgeous box by LENA LOKEN as their Top Pick.  Lena will also receive a winner's badge and will be in the running for a monthly Guest Designer spot.


Congratulations ladies and please email Cec to claim your prizes.

See you all back here on January 5th for our next challenge - the of the New Year.

Monday, December 17, 2012

Winners - #41 - Stencils & Masks

It was disappointing that more of you didn't enter our stencils and masks challenge because it really wasn't that difficult but maybe you were just too busy getting ready for Christmas.  Here are the winners from the entries we did have:


Our random winner of a digi of our choice and a winner's badge is KAREN McALPINE.

The Design Team has chosen this fabulous Christmas tag from CLAIRE C. as their Top Pick.  Claire will also receive a winner's badger and will be in the running for a monthly Guest Designer spot.


Congratulations ladies and please email Cec to claim your prizes.

Saturday, December 15, 2012

#42 - For A Gift

It is Saturday and time for a new challenge here at Sugar Creek Hollow - our last one for 2012.  Our designers have earned a break so we will be off for a couple of weeks but will return with a new challenge on January 5th. We wish all of you a lovely and safe holiday and we can't wait to see you in the New Year.

Now on to the challenge - this week we want you to make something FOR A GIFT. We want to see vintage or shabby chic projects that are useful for a gift but not a card. You can make gift bags or boxes, gift card or money enclosures or gift tags.

Once again we will be choosing one random winner who will receive a digi of our choice along with at winner's badge to display. The Design Team will also choose their Top Pick and that creator will receive a winner's badge but will also be in the running for a monthly Guest Designer spot.

Renee has created another fabulous tutorial for you and you can see it by scrolling down to the previous post.

This week we are pleased to have Jytte Grund Jensen joining us as a Guest Designer. Please make her feel welcome and visit her blog to check out her lovely work.

Jytte and our Design Team have made some fabulous inspiration for you.

Jytte Grund Jensen

Amelia Breytenbach

Cec Wintonyk

Heather Hudson

Linda Payne

Liz Droege

Patti Painter

Renee Matarese

Yvonne Whaley

Gift Box Tutorial

Renee here and I decided to make a gift basket and share how to make it with all of you. This basket is SO SIMPLE and you can customize it to fit your gift recipient in so many ways!

For supplies you will need:
  • One 1" x 7 1/2" piece of cardstock for handle
  • One 3/4" x 6" piece of paper for handle insert
  • One sheet of 8 1/2" x 11" paper for making square
  • Scoring tool
  • 2 brads
  • Additional paper and embellishments for your box.
Step 1. Use the largest die in Spellbinders grand nestabilites
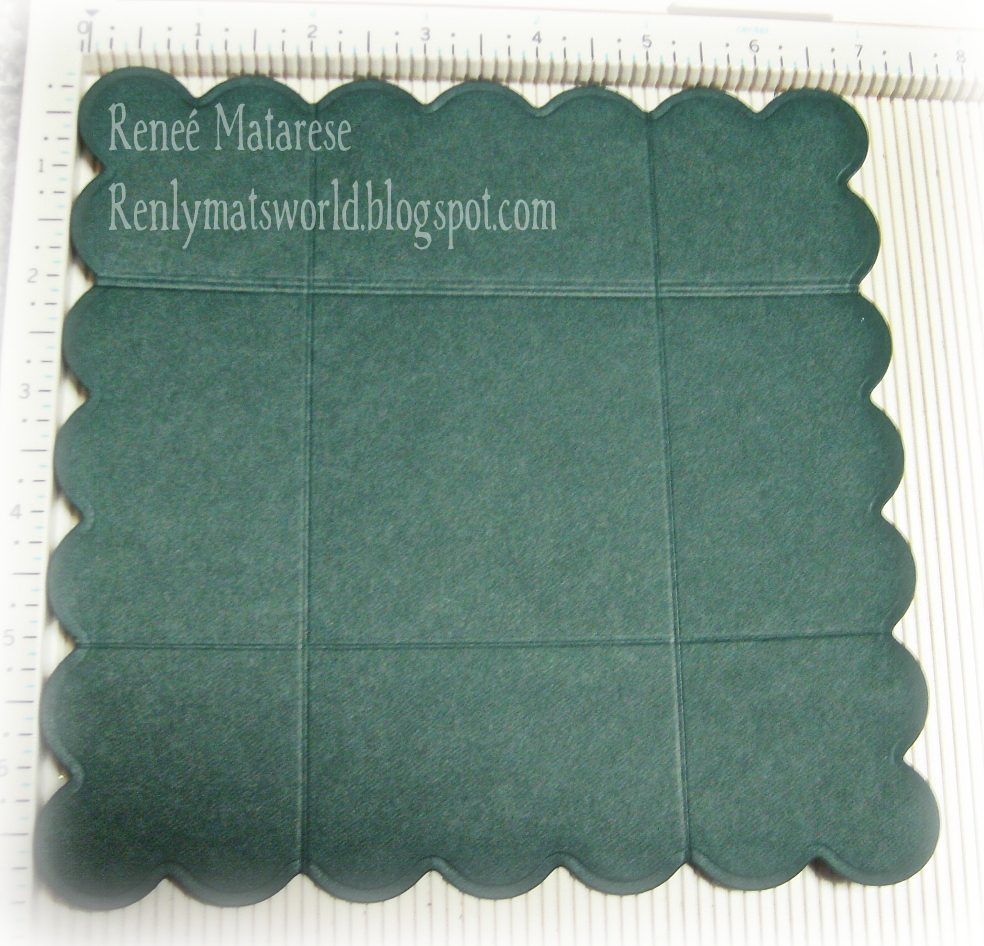
set or  just cut a square that measures 7 1/2" square. You can always add a decorative border with a punch or something if you desire.

Step 2. Score at 2" and 5" marks.  Turn and score again at same lengths.


Step 3. Cut along two of the score lines on each side just until they reach the center square. Then pre-fold on all score lines.


Step 4. Fold and glue the first two sides together.


Step 5. Fold up remaining two sides and glue. Now you have your basket base.


Step 6.  Cut 4 pieces with your paper of choice measuring 1 3/4" x 2 7/8". I added a pipe cleaner around the top and left a small opening where my cardinal will go.


Step 7. Add the smaller handle strip to the larger one.


Step 8. Place the handle in the basket.  Put glue on the bottom portion of each end and adhere to the basket.  Next punch holes and add the brads for added support and decorative detail.


Step 9.  Fill your box and give it away!

Monday, December 10, 2012

Winners - # 40 - Distressing

Here are the winners from our Distressing challenge last week:


The random winner of a digi of our choice and a winner's badge is CHRIS OLSEN.

The Design Team has chosen this gorgeous door hanger by SANDY as their Top Pick.  Sandy will also receive a winner's badge and will be in the running for a monthly Guest Designer spot.


Congratulations ladies and please email Cec to claim your prizes.

Saturday, December 8, 2012

# 41 - Stencils & Masks

Welcome back to Sugar Creek Hollow and our new challenge for this week, which is called STENCILS & MASKS.  We want you to make vintage or shabby chic cards and use stencils or masks to create backgrounds or other elements.

Once again we will be choosing one random winner who will receive a digi of our choice along with at winner's badge to display. The Design Team will also choose their Top Pick and that creator will receive a winner's badge but will also be in the running for a monthly Guest Designer spot.

This week Renee has a tutorial for you on stenciling with your Spellbinders dies so check it out by scrolling down to the previous post.

The Design Team has created some wonderful inspiration for you and have used their stencils & masks in a variety of ways.

Amelia Breytenbach

Cec Wintonyk

Heather Hudson

Linda Payne

Liz Droege

Patti Painter

Renee Matarese

Yvonne Whaley

Stenciling Tutorial

Renee here and since our challenge this week at Sugar Creek Hollow is to use stencils or masks I decided to make a little tutorial for you.

I chose to use some of my Spellbinders dies as stencils. The packages all say...CUT, EMBOSS, STENCIL but I think very few people actually stencil with them.  I thought I'd show you a quick "how to" if you'd like to see how easy it is.

First you need to cut your die and then run it through again to emboss it.


Next, take your ink pad (or sponge or dauber) and run ink over the embossed portions.

Don't forget to wipe the excess ink of the dies so you don't goof up your next project. (I use baby wipes).


The last step is to remove your embossed creation and use it on your card.


I used some on the inside as well.


Here's my finished card.


Monday, December 3, 2012

Winner - # 39 - Vintage Christmas

Here are the winner for our Vintage Christmas challenge:

The random winner of a digi of our choice and a winner's badge is MUEPPI.

The Design Team has chosen this lovely card by JOAN W. as their Top Pick. Joan will also receive a winner's badge and will be in the running for a monthly Guest designer spot.


Congratulations ladies and please email Cec to claim your prizes.

Saturday, December 1, 2012

# 40 - Distressing

Welcome back to Sugar Creek Hollow and a new challenge.  This week our theme is DISTRESSING and that means we want you to make vintage or shabby chic cards or other paper-crafted projects that have lots of distressing - torn edges, inking, etc.  If you are like me you will use this opportunity to add to your Christmas card stash since the time is fleeting by. Oh my goodness, it is already December 1st and that alone is making me a little distressed :)

We will be choosing one random winner who will receive a digi of our choice along with at winner's badge to display. The Design Team will also choose their Top Pick and that creator will receive a winner's badge but will also be in the running for a monthly Guest Designer spot.

Our designers have created wonderful inspiration for you so click on their names to check out the details and then come back and show us what you can come up with.

Amelia Breytenbach
Cec Wintonyk

Daniele Haddon

Heather Hudson

Linda Payne

Liz Droege

Patti Painter

Renee Matarese

Yvonne Whaley